


Based on the syllabus, sample item, and scoring guide shared below, here is a comprehensive breakdown of what learners must know and be able to do.
TOPIC : WEB DESIGN
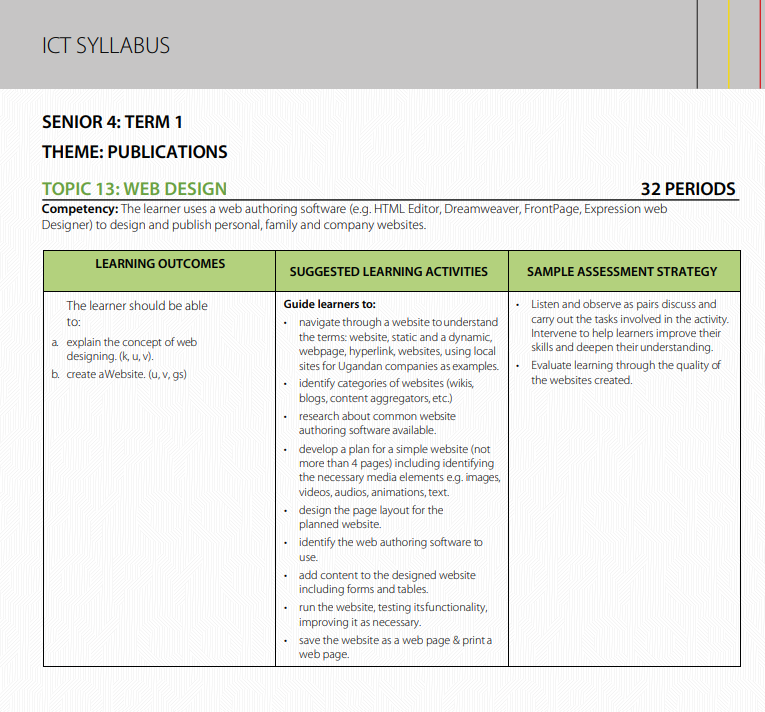
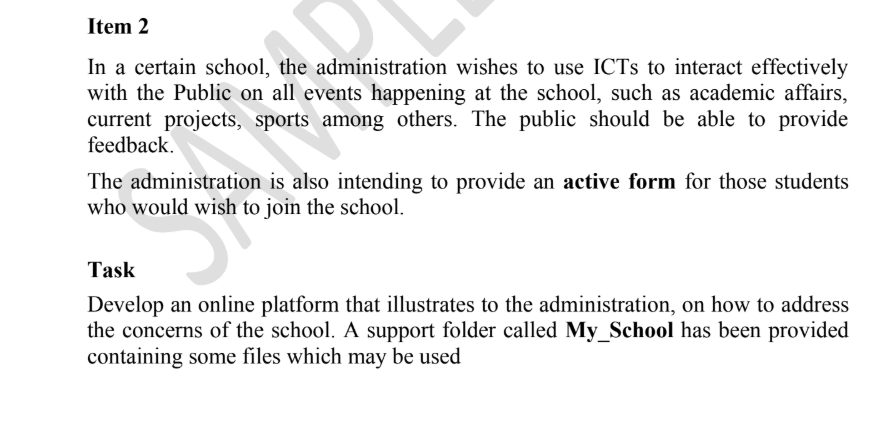
SAMPLE WEBSITE PRACTICE ITEM
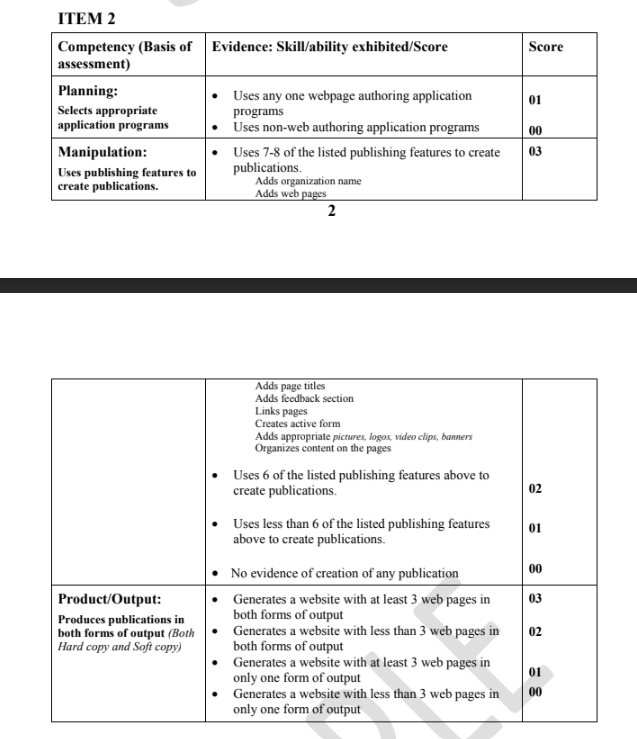
WEBSITE SCORING GUIDE
SECTION 1: THEORETICAL KNOWLEDGE (What They Must Know)
1.1 Key Terminology
Learners must be able to explain these terms clearly:
| Term | Definition |
|---|---|
| Website | A collection of related web pages hosted on a web server |
| Web page | A single document on the web, written in HTML |
| Static webpage | A page that displays the same content to every visitor (doesn’t change) |
| Dynamic webpage | A page that changes content based on user interaction or database |
| Hyperlink | A clickable link that connects one web page to another |
| Web authoring software | Programs used to create and design websites (e.g., Dreamweaver, FrontPage, HTML Editor, Expression Web Designer) |
1.2 Categories of Websites
Learners must identify and explain:

- Wikis – Collaborative websites (e.g., Wikipedia)
- Blogs – Personal or organizational journals updated regularly
- Content aggregators – Sites that collect content from multiple sources (e.g., news portals)
- E-commerce sites – For buying and selling
- Educational/Institutional sites – Like the school website in the sample item
1.3 Web Authoring Software
Learners must name and describe at least:
- Adobe Dreamweaver
- Microsoft FrontPage
- Microsoft Expression Web Designer
- HTML Editors (Notepad++, Sublime Text, etc.)
- WYSIWYG editors vs. code-based editors
SECTION 2: PRACTICAL SKILLS (What They Must DO)
This is where the biggest marks are. The scoring guide shows Manipulation carries 03 marks and Product/Output carries 03 marks — that’s 6 out of 7 total marks just from doing!
2.1 Planning Stage (01 mark)
The learner must:
- Open and use a webpage authoring application (e.g., Dreamweaver, FrontPage, or any HTML editor)
- Show evidence of planning — folder structure, page layout design
2.2 Manipulation – The 8 Publishing Features (03 marks for using 7–8)
To score full marks (03), the learner MUST use at least 7–8 of these features:
| # | Publishing Feature | How to Do It |
|---|---|---|
| 1 | Add organization name | Place the school name prominently on the homepage (header/banner) |
| 2 | Add web pages | Create multiple pages (minimum 3: Home, About, Contact, etc.) |
| 3 | Add page titles | Set a meaningful <title> for each page (appears in browser tab) |
| 4 | Add feedback section | Create a section where visitors can leave comments/feedback |
| 5 | Link pages | Create hyperlinks connecting all pages together (navigation menu) |
| 6 | Create an ACTIVE FORM | Build a form with input fields (name, email, message) and a submit button — this is specifically mentioned in the sample item for student enrollment |
| 7 | Add appropriate pictures, logos, video clips, banners | Insert images from the My_School folder, add a school logo, banner |
| 8 | Organize content on the pages | Use headings, paragraphs, tables, proper layout — content must be well-structured |
CRITICAL: If a learner uses only 6 features → 02 marks. Less than 6 → 01 mark. No publication → 00.
2.3 Product/Output (03 marks)
To score full marks (03), the learner must:
| Requirement | Details |
|---|---|
| At least 3 web pages | Home page + at least 2 other pages |
| BOTH forms of output | Soft copy (saved as .html/.htm files in a folder) AND Hard copy (printed web pages) |
CRITICAL: If only one form of output is produced → maximum 01 mark even if the website is perfect!
SECTION 3: STEP-BY-STEP PRACTICAL WORKFLOW
Teach your learners to follow this exact sequence during the exam:
Step 1: Create the Folder Structure
My_School/
├── index.html (Home page)
├── about.html (About the school)
├── academics.html (Academic affairs)
├── sports.html (Sports)
├── projects.html (Current projects)
├── feedback.html (Feedback section)
├── enroll.html (Active form for new students)
── images/ (logos, pictures, banners from provided folder)
Step 2: Design the Page Layout
- Header with school name/logo/banner
- Navigation menu linking all pages
- Main content area
- Footer with contact info
Step 3: Build Each Page with Required Features
- Set page titles for every page
- Add text content about academic affairs, sports, projects
- Insert images, logos, banners from the My_School folder
- Create hyperlinks between all pages
- Add a feedback section (can be a simple form or comment area)
- Create an active form for student enrollment with fields like:
- Student Name
- Date of Birth
- Previous School
- Parent/Guardian Name
- Contact Number
- Submit button
Step 4: Test the Website
- Open in a browser
- Click all links to ensure they work
- Test the form
- Check that images display correctly
Step 5: Save and Print (BOTH outputs!)
- Soft copy: Save all .html files in the My_School folder
- Hard copy: Print at least 3 web pages (File → Print in browser)
SECTION 4: TIPS FOR FLYING COLOURS
Common Mistakes to Avoid:
- Creating only 1 or 2 pages → loses Product/Output marks
- Forgetting to print (hard copy) → loses up to 2 marks on output
- Not creating the active form → loses a manipulation feature
- Not linking pages together → loses hyperlink feature
- Not using images/logos from the provided folder → loses media feature
- Not setting page titles → loses a feature
- Poor content organization → loses organization feature
Checklist for Learners (Exam Day):
□ Opened web authoring software          → Planning (01)
□ Created at least 3 web pages           → Output
□ Added school/organization name         → Feature 1
□ Added page titles to all pages         → Feature 2
□ Linked all pages together              → Feature 3
□ Added feedback section                 → Feature 4
□ Created active enrollment form         → Feature 5
□ Added pictures/logos/banners           → Feature 6
□ Organized content properly             → Feature 7
□ Saved as soft copy (.html files)       → Output
□ Printed hard copy of pages             → Output
SECTION 5: MARKS BREAKDOWN SUMMARY
| Competency | Max Score | What’s Needed |
|---|---|---|
| Planning | 01 | Use any web authoring application |
| Manipulation | 03 | Use 7–8 publishing features |
| Product/Output | 03 | ≥3 pages in BOTH hard & soft copy |
| TOTAL | 07 |
FINAL ADVICE FOR TEACHERS
- Practice the full workflow — learners should build complete websites in class, not just learn theory
- Emphasize BOTH outputs — many learners forget to print; drill this into them
- Teach the active form — this is specifically tested and often overlooked
- Use the My_School folder concept — practice working with provided resource folders
- Time management — 32 periods in the syllabus means this topic is substantial; allocate enough practical time
- Peer review — have learners check each other’s websites against the scoring guide checklist





 Exinet Academy